


Ankle injuries and instability and how to tape them: notes from a physical therapist
Tape glorious tape!

This really has been the bread and butter of my career. From a nasty ankle sprain of my own crazy athlete career, to being the therapist taping ankles for a day job. Ankle instability for runners can be catastrophic! From rolling your ankle on a stone, curb, branch, dodging an escaped-from-his-leash doggo and about everything in between.
As a trail runner I carry tape with me on every single run, just incase. Call it paranoia (or a smarty pants who has been there, done it and had to walk home limping) but I lived and learned to never be without some sturdy sports tape; you never know when you’re going to need it.
To get familiar with taping technique, the how to’s, you ought to be clued up on the ‘why’. And that, is exactly where we’re going to start.


Athletic tape, when applied correctly, can help stabilize a joint by acting on behalf of your ligaments (the connective tissue that connects bone-to-bone). The tape, rigid and strong will mimic your ligamentous tissue; also pretty rigid and strong.
Ligaments stop the joint from going too far beyond the natural movement. On your ankle, the ligaments job is to stop the rolling of the ankle joint its-self, but a lack in training, your technique and overall conditioning, will determine if your ligaments give up, let it go you fall over and damage ligaments OR it stops the movement and snaps you all back into place, with a ‘whoa that was close’ smile on your face.
NOTE: A SPRAIN is when you tear fibres of ligamentous tissue. A STRAIN is tearing fibres of muscular tissue, hence ankle sprain and hamstring strain; get these mixed up and you’l give your physical therapist a giggle.
With me so far?


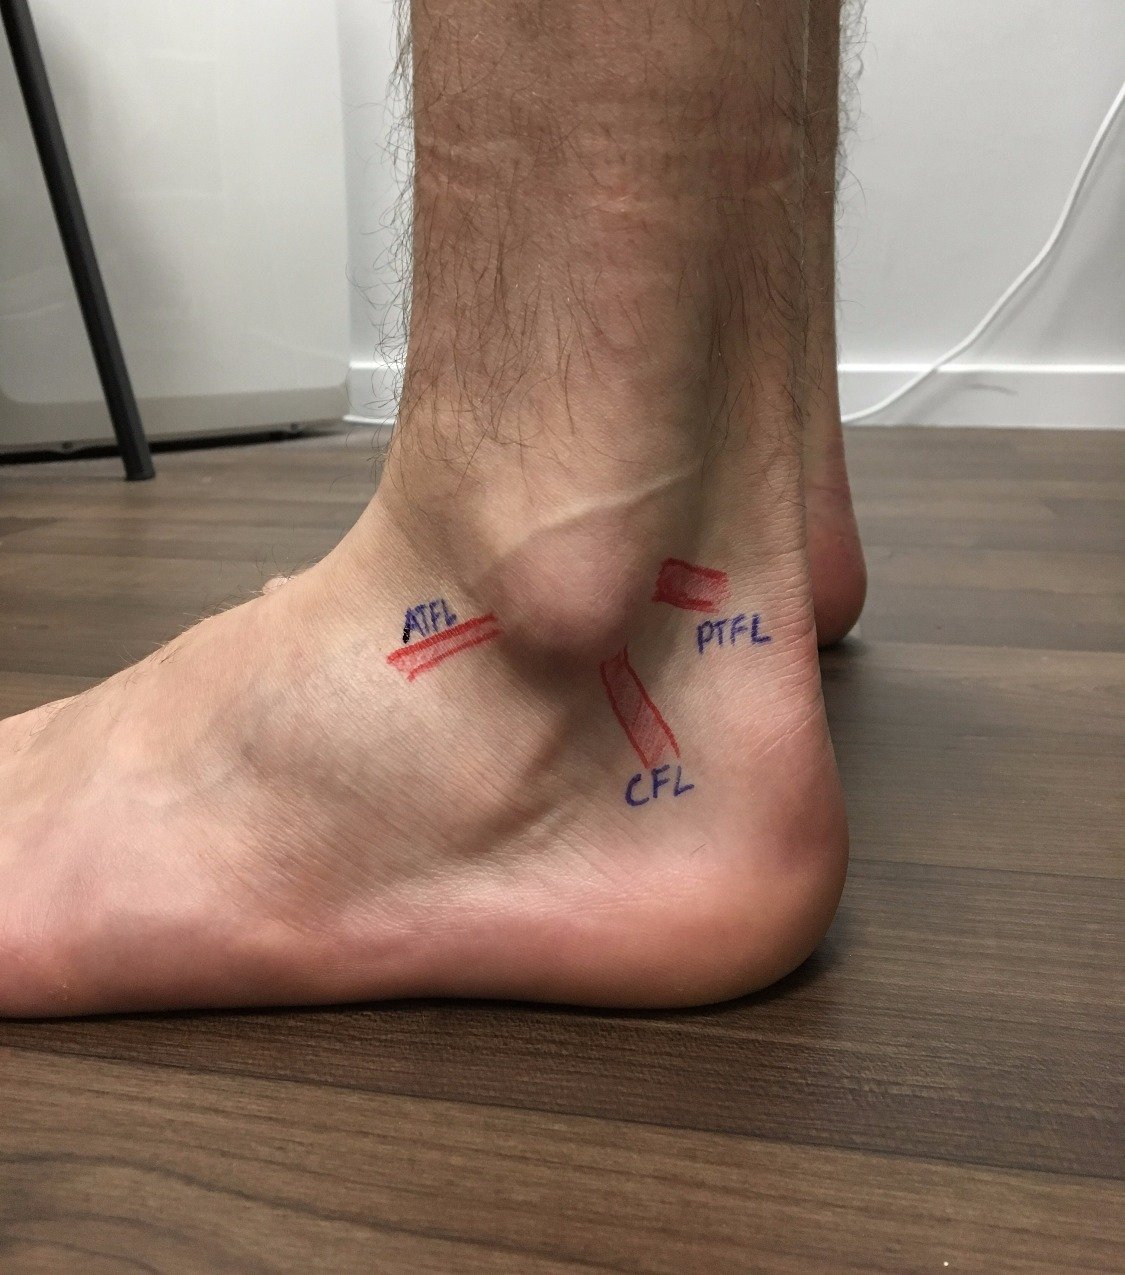
The ankle ligaments were are most likely to damage are the:
Their names simply indicate their location, see below. (we will use their abbreviations for ease and simplicity of ATFL – front on ankle, CFL middle of ankle joint, and PTFL – back of the ankle joint. Simples).

Now the severity of the a ligament sprain like our ankle sprain, is graded in three different classifications:

There is also something called, ‘chronic ankle instability’ which either comes from a pathological joint laxity (looseness of ligaments) or through functional instability which relates to your proprioception and neuromuscular responses – usually through a previous strain and having not completed sufficient rehabilitation. Either are not good. And with either, or a light Grade 1 ankle sprain, tape can help assist your ankle ligaments do their job (enough to get you home, tape IS NOT A Long term solution!!!)
As a generalisation, when your physician explains you have an ankle sprain, these are the ligaments to target with the tape, in relation to the grade of injury:

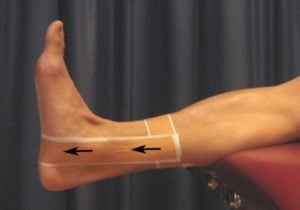
There are a few choices, but for a sprain and instability of your ankle, a tough, strong tape like Zinc oxide or power tape would work great here.
Many opt for Kinesiology tape (or K-Tape, Tiger tape) – but applying this when you need support is a big old waste of money and frankly will not do much for you. K-tape is designed to aid with swelling, circulation to an injury, but also movement to support MUSCLE later on in the rehabilitation and healing journey (alongside those all important exercises!)
PLEASE NOTE: Taping techniques are for light Grade 1 ankle sprains or chronic ankle instability in order to ASSIST your body to run and move safely. Tape help assists your ankle ligaments do their job (enough to get you home, tape IS NOT a Long term solution!!!) you need to keep on the exercises and balances to rebuild your proprioception, neuromuscular control and effect, get your ankle to do its job again, safely.


